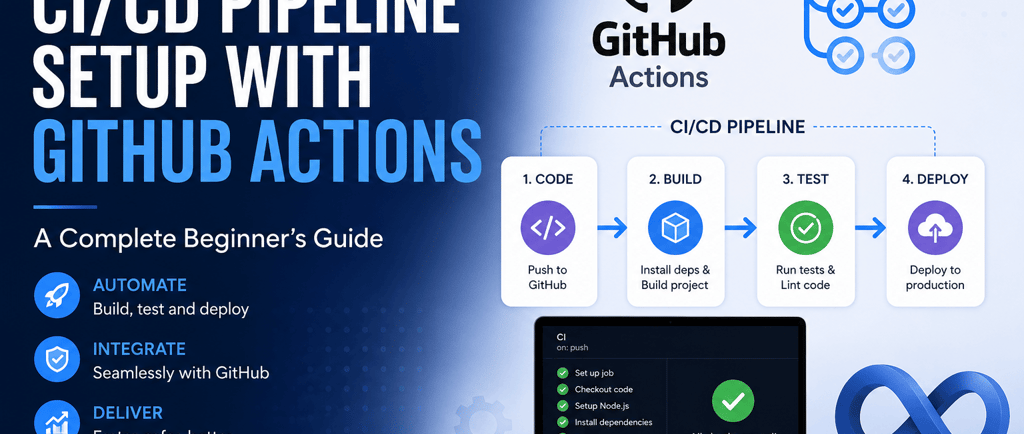
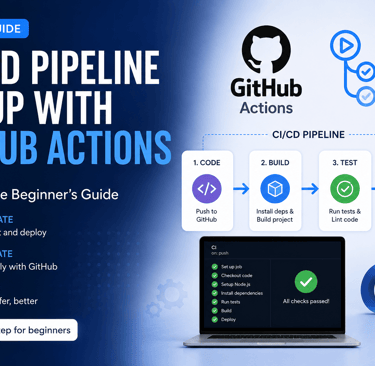
CI/CD Pipeline Setup with GitHub Actions: A Complete Beginner's Guide
step-by-step tutorial showing how to build a CI/CD pipeline from scratch using GitHub Actions — covering workflow files, triggers, testing, and deployment to AWS or Docker
TOOLS
Siva T
5/19/20267 min read
AFFILIATE DISCLAIMER: This post contains affiliate links. If you click and make a purchase, I may earn a small commission at no extra cost to you. I only recommend stuff I actually believe in.
Let me guess — you've heard "CI/CD pipeline GitHub Actions" thrown around in every DevOps conversation and you're thinking, "What the heck does that even mean for me?"
Or maybe you're already pushing code to GitHub but you're still deploying manually — running scripts, SSHing into servers, praying nothing breaks.
That was me two years ago.
Every deploy felt like defusing a bomb.
One wrong move and the whole app goes down — at 11 PM on a Friday.
Then I discovered CI/CD pipeline GitHub Actions and it completely changed how I ship code.
In this guide, I'm going to walk you through exactly what it is, why it matters, and how to set one up step-by-step — even if you've never touched DevOps in your life.
Quick Note: This guide assumes you know basic Git and have a GitHub account. If you're brand new to Git, check out our Git beginner's guide first. (internal link opportunity)
🚀 Want to Master DevOps Faster? Discover the training that took me from manual deployments to fully automated pipelines — without the trial-and-error nightmare.
👉 🔥 Grab the Course — Don't Miss Out →
What Even Is a CI/CD Pipeline? (Plain English, I Promise)
Before we touch GitHub Actions, let's get the concept straight.
CI = Continuous Integration.
Every time you push code, it automatically gets tested and merged.
No more "it works on my machine" chaos.
CD = Continuous Delivery (or Deployment).
After your tests pass, the code automatically ships to staging or production.
Think of it like a factory assembly line.
You drop your code in at one end.
It gets tested, built, and delivered — automatically — out the other end.
GitHub Actions is the engine that runs this factory for you — right inside your GitHub repo.
No separate tools. No expensive subscriptions to start. No complicated server setups.
Why it matters:
Catch bugs early — tests run automatically on every push
Deploy with confidence — no more manual steps or human error
Save hours every week — automate what you were doing by hand
Look like a pro — this is standard practice at every serious tech company
How GitHub Actions Works — The 3-Minute Version
GitHub Actions uses something called a workflow file — a YAML file you drop into your repo — and GitHub does the rest.
Here's the mental model:
Workflow — the whole automation process you define
Trigger (on:) — what event kicks it off (push, pull request, schedule, etc.)
Job — a set of steps that run together on a virtual machine
Step — a single task inside a job (run a command, use an action, etc.)
Runner — the virtual machine (GitHub provides Ubuntu, Windows, macOS for free)
That's it.
Once you get this mental model, reading any workflow file becomes easy.
🎬 Watch: GitHub Actions Full Tutorial for Beginners (YouTube)
(Embed this video — it's exactly what I wish I had when I started.)
Setting Up Your First CI/CD Pipeline GitHub Actions — Step by Step
Alright, enough theory. Let's build something real.
I'll walk you through a beginner-friendly DevOps pipeline setup for a Node.js app.
(The logic works for Python, Ruby, Go — same concept, slightly different commands.)
Step 1 — Create Your Workflow Directory
In your repo root, create the folder .github/workflows/
This is where GitHub looks for your automation files.
Step 2 — Create Your First Workflow File
Inside that folder, create a file called ci.yml
The name doesn't matter much — the content does.
Step 3 — Write Your Workflow
Here's a basic CI workflow:
yaml
name: CI/CD Pipeline
on:
push:
branches: [ main ]
pull_request:
branches: [ main ]
jobs:
build-and-test:
runs-on: ubuntu-latest
steps:
- name: Checkout code
uses: actions/checkout@v4
- name: Set up Node.js
uses: actions/setup-node@v4
with:
node-version: '20'
cache: 'npm'
- name: Install dependencies
run: npm ci
- name: Run tests
run: npm test
- name: Build project
run: npm run build
Step 4 — Push to GitHub and Watch It Run
Commit, push, then head to the Actions tab in your repo.
You'll see your workflow running live.
Step 5 — Check Results and Iterate
Green checkmark = pass. Red X = something failed.
Click in to see exactly which step broke and why.
What Each Part Does (So You're Not Just Copy-Pasting)
on: push / pull_request — Triggers the workflow when you push code or open a PR to main
runs-on: ubuntu-latest — GitHub spins up a fresh Ubuntu VM to run everything
actions/checkout@v4 — Pulls your repo code into the runner so it can work with it
actions/setup-node@v4 — Installs Node.js on the runner
npm ci — Installs dependencies cleanly (faster and safer than npm install in CI)
npm test — Runs your test suite. If tests fail, the pipeline stops here.
npm run build — Builds your production bundle
💡 Pro Tip: Use npm ci instead of npm install in your pipelines. It's faster, stricter, and won't accidentally update your package-lock.json. This is a DevOps pipeline setup best practice that most beginners skip. (internal link opportunity)
Adding Automatic Deployment — The CD Part
Running tests automatically is great.
But the real magic of a CI/CD pipeline GitHub Actions setup is auto-deploying after tests pass.
Here's how to add a deployment job:
yaml
deploy:
needs: build-and-test
runs-on: ubuntu-latest
if: github.ref == 'refs/heads/main'
steps:
- name: Checkout code
uses: actions/checkout@v4
- name: Deploy to server
uses: appleboy/ssh-action@v1.0.3
with:
host: ${{ secrets.SERVER_HOST }}
username: ${{ secrets.SERVER_USER }}
key: ${{ secrets.SSH_PRIVATE_KEY }}
script: |
cd /var/www/myapp
git pull origin main
npm ci
npm run build
pm2 restart app
Notice needs: build-and-test — this means the deploy job only runs if the first job passes.
Your credentials go into GitHub Secrets — never hardcode passwords in your workflow file.
Storing Secrets Safely
Go to your repo → Settings → Secrets and variables → Actions
Click New repository secret
Add SERVER_HOST, SERVER_USER, SSH_PRIVATE_KEY
Reference them as ${{ secrets.SECRET_NAME }} in your workflow
⚡ Still Feeling Overwhelmed? There's a shortcut. This resource gave me the exact framework to automate my entire deployment workflow in a weekend — even as a solo developer. Curious what's inside?
👉 🎯 See What's Inside — I'm Curious →
Real-World Example: My First GitHub Actions Tutorial Moment
Let me tell you about the first time this clicked for me.
I was working on a side project — a simple REST API.
Every time I had a new feature, I'd manually SSH into my DigitalOcean droplet, pull the code, restart the server, and pray the app came back up.
One Sunday, I accidentally pushed broken code at 2 AM.
App went down. I didn't notice until Monday morning.
That was my breaking point.
I spent that Monday afternoon setting up a CI/CD pipeline GitHub Actions workflow — tests, build, deploy, the whole thing.
From that point on:
Every push triggered tests automatically
Broken code never made it to production
Deploys happened in 2 minutes without me touching anything
I got my Sunday nights back
This is what automate deployment actually means in practice — not just convenience, but peace of mind.
Common Mistakes Beginners Make (And How to Dodge Them)
Hardcoding credentials in the workflow file. Always use GitHub Secrets. One exposed API key can ruin your day.
Not caching dependencies. Add cache: 'npm' or equivalent — it cuts your pipeline time significantly.
Only testing on one environment. Use a matrix strategy to test across multiple Node or Python versions.
Skipping the needs: keyword. Without it, jobs run in parallel and you might deploy broken code before tests even finish.
Deploying from every branch. Use if: github.ref == 'refs/heads/main' so only your main branch triggers a deploy.
Advanced CI/CD Features Worth Knowing
Once you've got the basics down, these features take your DevOps pipeline setup to the next level.
Matrix Builds — Test Across Environments
yaml
strategy:
matrix:
node-version: [18, 20, 22]
os: [ubuntu-latest, windows-latest]
This runs your tests in 6 combinations automatically. Powerful for library authors or cross-platform apps.
Scheduled Workflows — Run on a Timer
yaml
on:
schedule:
- cron: '0 8 * * 1-5' # Weekdays at 8 AM UTC
Great for daily health checks, database cleanup jobs, or sending automated reports.
Caching for Speed
yaml
- uses: actions/cache@v4
with:
path: ~/.npm
key: ${{ runner.os }}-node-${{ hashFiles('**/package-lock.json') }}
This stores your node_modules between runs and can shave 2–3 minutes off every build.
GitHub Actions vs Other CI/CD Tools — Is It Worth It?
You might be wondering: what about Jenkins, CircleCI, or GitLab CI?
Here's my honest take:
Jenkins — incredibly powerful, but you're managing your own server. Way too much overhead for most projects starting out.
CircleCI / Travis CI — solid tools, but they cost money faster and live outside GitHub.
GitHub Actions — lives where your code already is, free for public repos, generous free tier for private repos (2,000 minutes/month), and the ecosystem of pre-built Actions is massive.
For most beginners and small-to-medium teams? GitHub Actions is the right starting point. You can always migrate later if you outgrow it.
Quick Recap
A CI/CD pipeline GitHub Actions workflow automates testing and deployment
Workflow files live in .github/workflows/ as YAML
Triggers, Jobs, Steps, and Runners are the four core concepts
Always use GitHub Secrets — never hardcode credentials
Add needs: to chain jobs in the right order
Start simple, then layer in caching, matrix builds, and scheduled runs
💡 Ready to Level Up Your DevOps Game? If this guide helped, imagine what a structured, battle-tested course could do. This is the one resource I keep recommending to anyone serious about automating their workflow — beginner or not.
👉 🚀 Unlock It Now — Limited Time →
Frequently Asked Questions
Is GitHub Actions free? Yes — free for public repos with unlimited minutes. Private repos get 2,000 free minutes/month on the Free plan. That's more than enough for most solo developers and small teams.
Do I need to know YAML to use GitHub Actions? You need the basics — indentation, key-value pairs, and lists. You don't need to be a YAML expert. After a few workflows, it becomes second nature.
What's the difference between continuous delivery and continuous deployment? Continuous Delivery means your app is ready to deploy automatically, but a human still approves the final push to production. Continuous Deployment goes one step further — it deploys automatically every time tests pass, no human needed. Most teams start with delivery, then move to deployment as confidence grows.
Can I use GitHub Actions for non-Node.js projects? Absolutely. GitHub Actions supports Python, Go, Ruby, Java, PHP, Rust, and more. The workflow structure is identical — just swap out the setup action and run commands.
How do I debug a failing GitHub Actions workflow? Click the failing job in the Actions tab to see step-by-step logs. You can also add ACTIONS_STEP_DEBUG: true as a repository secret for more verbose output.
Is a CI/CD pipeline GitHub Actions setup good for solo developers? 100%. Solo developers benefit the most — you don't have a team catching your mistakes before they hit production. A CI/CD pipeline GitHub Actions workflow acts like a co-pilot that runs tests and deploys for you, even at 2 AM.
Final Thoughts — Start Small, Automate Everything
The beauty of a CI/CD pipeline GitHub Actions setup is that you don't have to do it all at once.
Start with one workflow that runs your tests.
Then add a deploy step.
Then layer in caching, environment matrices, Slack notifications — whatever your project needs.
The first time you push code and watch a green checkmark appear — and then your app just deploys itself — it genuinely feels like magic.
But it's not magic. It's just smart automation.
And now you know exactly how to set it up.
Found this useful? Share it with a dev friend who's still deploying manually. And if you want to go deeper on automating your entire workflow, the resource below is the fastest path I've found.
👉 🚀 Start Automating Like a Pro →
Affiliate Disclaimer: This post contains affiliate links. I earn a commission on qualifying purchases at no extra cost to you.
Brand
Explore our sleek website template for seamless navigation.
Contact
Newsletter
info@email.com
+919698154595
© 2026. All rights reserved.